
Trusted by 155+ Homeowners
How Pros Repair Interior Damage From A Roof Leak
- Over 157 5-Star Reviews
- Free Estimates and Quotes
- 100% Satisfaction Guaranteed
- Child, Family & Pet Safe Steps
- 24-Hour Emergency Service
- Fully Licensed & Insured
Professionals repair interior damage from a roof leak by first assessing the extent of the water damage. Then they focus on drying the affected areas thoroughly.
The next steps involve removing damaged materials and restoring the structural integrity of your home to prevent further issues.
TL;DR:
- Assess the full scope of water damage from the roof leak.
- Dry out all affected areas using specialized equipment.
- Remove and replace any materials that cannot be salvaged.
- Address mold prevention and ensure a safe environment.
- Restore your home to its pre-damage condition.
How Pros Repair Interior Damage From a Roof Leak
Discovering water stains on your ceiling or walls can be unsettling. A roof leak, even a small one, can lead to significant interior damage if not addressed promptly. Professionals have a systematic approach to tackling this problem.
We found that understanding the process can help you feel more in control. It involves careful assessment, thorough drying, and meticulous restoration. Let’s break down how experts handle interior damage from a roof leak.
Understanding the Initial Damage Assessment
The first step for any restoration professional is a detailed inspection. They need to understand the full scope of the water damage. This includes checking for water penetration beyond the visible signs.
They look for damaged drywall, insulation, and even structural wood. The goal is to identify every area affected by the leak. This detailed assessment is key to planning the repair effectively.
The Importance of Immediate Water Extraction
Once the assessment is complete, the focus shifts to removing standing water. If there’s visible water pooling, it needs to be extracted quickly. This prevents water from spreading further into your home’s structure.
Professionals use powerful pumps and vacuums for this task. It’s a critical step in preventing secondary damage. This is where the damage cleanup steps truly begin.
Why Your Roof is the #1 Source of Water Damage
It might seem obvious, but many homeowners underestimate the direct roof leak connection. Your roof is the first line of defense against the elements. When it fails, water can enter almost anywhere.
Common culprits include damaged shingles, flashing issues, or ice dams. Understanding this link helps in preventing future problems.
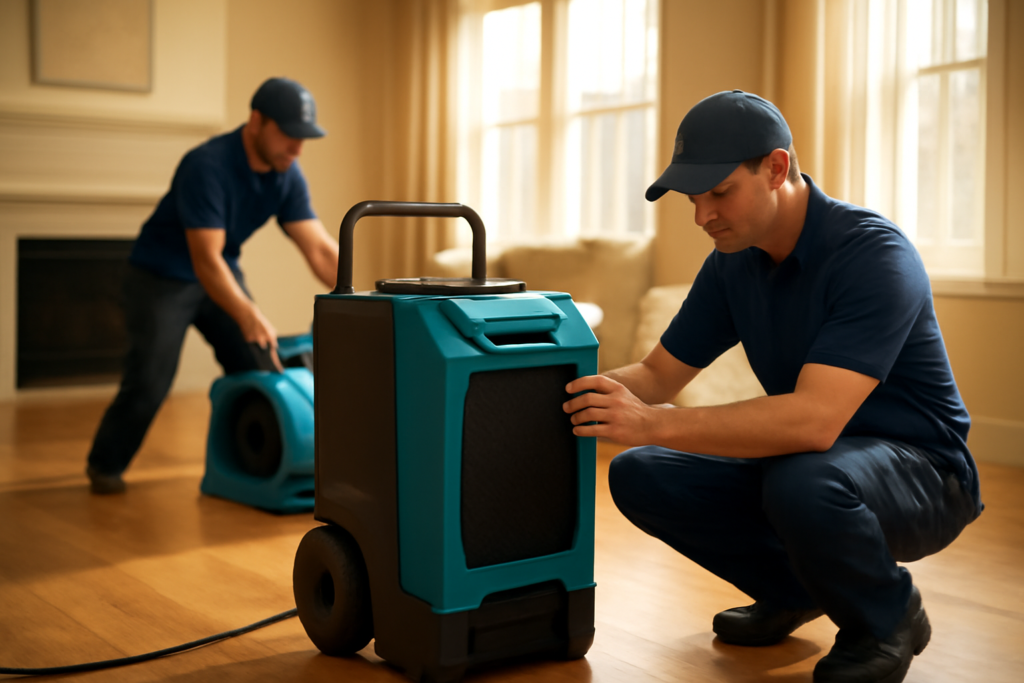
Drying Out Your Home: A Professional Approach
This is arguably the most crucial phase. Simply wiping up visible water isn’t enough. Professionals use specialized equipment to dry out your home completely.
They employ industrial-grade dehumidifiers and air movers. These machines work tirelessly to remove moisture from the air and materials. This process helps prevent mold growth and structural warping. It’s a detailed procedure, essential for interior water damage mitigation.
The Role of Humidity Control
Controlling humidity levels is vital. High humidity can keep building materials damp for weeks. This creates an ideal environment for mold and mildew to thrive.
Dehumidifiers pull moisture from the air, reducing the humidity. Air movers circulate air, helping to speed up evaporation. This combination is key to drying out water intrusion risks.
Removing Damaged Materials
Not all materials can be saved after water exposure. Drywall, insulation, and carpeting that have been saturated often need to be removed. This is especially true if they show signs of mold or cannot be thoroughly dried.
Professionals carefully identify and remove these items. This ensures that only clean, dry, and structurally sound materials remain. It’s about restoring a safe environment.
When Gutters Cause More Water Damage
Sometimes, the issue isn’t the roof itself but how water is managed. Clogged or damaged gutters can cause water to back up. This backup can then seep under your roof or into your foundation.
It’s a common reason for unexpected roof water damage. Maintaining your gutters is part of protecting your home’s interior.
Addressing Mold and Mildew Prevention
Mold can start to grow within 24-48 hours of water exposure. It poses serious health risks and can spread quickly. Professionals take mold prevention very seriously.
They use antimicrobial treatments on affected areas. Thorough drying is the best defense against mold. If mold is present, it will be safely remediated. This ensures your home is not only dry but also healthy.
Repairing and Restoring Your Interior
Once the drying and cleaning are complete, the restoration phase begins. This involves repairing or replacing damaged surfaces. This includes patching drywall, repainting, and reinstalling flooring.
The goal is to make your home look and feel as it did before the leak. It’s about bringing your home back to normal.
The Restoration Cost Factors
The expense of repairing interior damage from a roof leak can vary. Several factors influence the restoration cost factors. The size of the affected area is a major one.
The type of materials damaged and the extent of structural compromise also play a role. Consulting with a professional can provide a clearer picture of the overall expense. Understanding the repair costs involved is essential.
A Checklist for Roof Leak Interior Damage Repair
Here’s a quick rundown of what to expect when pros handle your roof leak damage:
- Initial Inspection: Thorough assessment of all affected areas.
- Water Extraction: Removing any standing water promptly.
- Drying Process: Using specialized equipment to dry materials.
- Sanitization: Cleaning and treating areas to prevent mold.
- Material Removal: Discarding unsalvageable damaged items.
- Reconstruction: Repairing and restoring damaged surfaces.
Preventing Future Roof Leak Issues
Regular roof maintenance is the best way to prevent leaks. Inspecting your roof for damage after storms is wise. Keeping your gutters clean also helps prevent water from pooling near your home’s foundation.
Addressing small issues before they become big problems can save you a lot of trouble and expense. It’s about protecting your home investment.
Conclusion
Repairing interior damage from a roof leak requires a methodical and expert approach. From initial assessment and water extraction to thorough drying and reconstruction, professionals ensure that your home is restored safely and effectively. Don’t wait to get help if you suspect a roof leak; prompt action can prevent more extensive damage and costly repairs. For reliable and expert assistance in Eden Prairie, Eden Prairie Restoration Pros is a trusted resource for restoring your home after water damage.
What are the first signs of interior damage from a roof leak?
The most common signs include water stains on ceilings or walls, peeling paint, or sagging drywall. You might also notice a musty odor, which can indicate mold growth. Sometimes, you’ll see drips of water from the ceiling.
How quickly can mold grow after a roof leak?
Mold can start to grow in as little as 24 to 48 hours after water exposure. The key is to dry out the affected areas as rapidly as possible to prevent spores from taking hold and multiplying.
Can I dry out water damage myself?
For minor surface moisture, you might be able to dry it out with fans and dehumidifiers. However, for anything more substantial, professional drying equipment and expertise are usually needed to ensure all hidden moisture is removed and to prevent mold and structural issues.
How long does the drying process take?
The drying process can take anywhere from a few days to a couple of weeks, depending on the extent of the water damage, the type of materials affected, and the humidity levels. Professionals monitor the drying process closely.
Should I worry about electrical hazards after a roof leak?
Yes, absolutely. Water and electricity are a dangerous mix. If water has come into contact with any electrical outlets, fixtures, or wiring, you should shut off the power to that area at the breaker box if it is safe to do so and call a professional right away.

Levi Lemieux is a licensed Damage Restoration Expert with more than 20 years of hands-on experience in disaster recovery and structural mitigation. As a seasoned industry authority, Levi has dedicated two decades to mastering the technical complexities of environmental safety, providing property owners with the reliable expertise and steady leadership required to navigate high-stress property losses with absolute confidence.
𝗖𝗲𝗿𝘁𝗶𝗳𝗶𝗰𝗮𝘁𝗶𝗼𝗻𝘀: Levi holds elite IICRC credentials, including Water Damage Restoration (WRT), Applied Structural Drying (ASD), Mold Remediation (AMRT), Fire and Smoke Restoration (FSRT), and Odor Control (OCT).
𝗙𝗮𝘃𝗼𝗿𝗶𝘁𝗲 𝗣𝗮𝘀𝘁𝗶𝗺𝗲: When off-site, Levi is a passionate mountain biker and an amateur astronomer, hobbies that reflect the endurance and precision he brings to every restoration project.
𝗕𝗲𝘀𝘁 𝗣𝗮𝗿𝘁 𝗼𝗳 𝘁𝗵𝗲 𝗷𝗼𝗯: He finds the most fulfillment in providing a clear path forward for families, turning a site of devastation back into a safe, comfortable home.